If you’re new to using a karambit knife, they can seem very awkward to hold and use, so what is the proper way to go about it? I’ve boiled it down to the very basics for beginners, so let’s take a look at how you should hold and use a karambit knife.
There are three main karambit knife grips: the forward, reverse, and extended grips. Once you have practiced the various holds, you can begin learning transitions and striking techniques with your karambit. You can use transitions to switch grips, switch hands, or perform flashy tricks.
There is quite a lot that goes into learning and using a karambit knife properly and safely, but once you take the time to learn the basics, the possibilities are nearly endless. From using your karambit for self-defense to show off your skills to your friends, learning to use a karambit is a very rewarding endeavor.
To ensure you get off on the right foot when first learning to use a karambit knife, let’s take a look at the very basic knife holds, transitions, and striking techniques. Learning these things will give you a rock-solid foundation that you can expand upon and learn more advanced and flashier tricks and techniques. Let’s get into it!
Table of Contents
How Do You Use a Karambit Knife?
Using a karambit knife is a very physically challenging skill that gets you up close and personal with your subject. The blade on a karambit is relatively short, which means you’re right up next to whatever subject whenever you’re using your blade.
For a full breakdown of what exactly you can use your karambit knife to do, make sure to check out my article on the subject.
When using your karambit knife, you can break everything you do into three main categories: grips, transitions, and striking techniques. There are some gray areas, such as many karambit tricks, but in general, everything you’ll do with your knife will be one of those three things.
Each element of using a karambit knife builds upon the last, so make sure to take the time and get each aspect right before continuing.
How to Properly Hold a Karambit Knife
Properly holding your karambit knife is one of the most foundational aspects of using one, so you must learn and get each grip right to do well with transitions and striking techniques later. None of the karambit knife grips are particularly tricky, but you should get comfortable with each and be able to pick up your knife in any grip.
Forward Karambit Knife Grip
Also known as the standard grip, the forward karambit knife grip is one of the most practical and is the one you’ll likely use the most often. It’s far from complicated and should be pretty straightforward to learn and practice. Below I’ll give you step-by-step instructions on how to form the forward karambit knife grip:
Step 1:
First, position your hand palm-up and place your karambit’s handle into your hand with the spine up against your thumb. The ring at the end of the handle should be hanging off the side of your palm, opposite your thumb.
Step 2:
Place your thumb against the spine of your knife near the rear of the blade. Wrap your remaining four fingers around the handle of the knife until you’re gripping it tightly. Ensure your hand is not touching any part of the blade; it should be positioned above your grip and out of harm’s way.
You should be holding your karambit knife tightly with the blade facing downwards and your thumb up against the knife’s spine (which is facing upwards) to hold it steady.
The forward karambit knife grip is an excellent utilitarian grip for everyday activities and chores. It allows you to put a lot of power behind your blade because your thumb can press down and steady the knife. The forward grip gives you a lot of control and power, but it can be challenging to maneuver, and it inhibits a good range of reach.
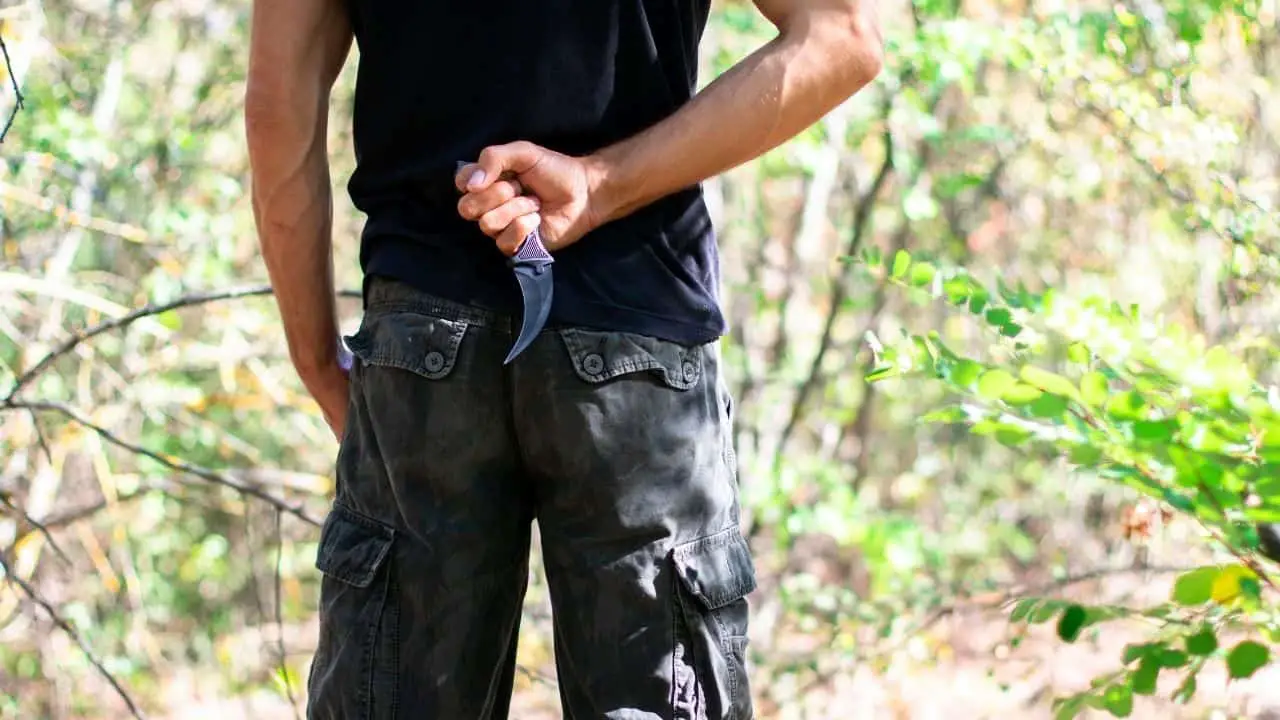
Reverse Karambit Knife Grip
While less practical in everyday life than the forward grip, the reverse grip is actually quite useful in permitting situations. It is commonly seen as the “classic” karambit knife grip and is what most people think of when you mention a karambit knife. Let’s look at how to for the reverse karambit knife grip:
Step 1:
Slip your index finger through the hole at the end of your karambit’s handle (or just place the handle in your hand if your knife doesn’t have a ring). Let the knife handle dangle downwards across your palm.
Step 2:
Next, rest your thumb against the ring or butt of your knife. Wrap your remaining four fingers around the handle of the knife and grip it firmly. Ensure the blade is entirely below your fist to ensure you don’t cut yourself while holding it.
If you’re holding your karambit in a proper reverse grip, the blade should be pointing downwards with the blade edge facing out. Your hand should be tightly gripping the handle with your thumb pressed against the butt of the handle and your index finger through the ring (if your karambit has one).
The reverse karambit knife grip is an excellent tactical grip that allows for quite a bit of maneuverability. While it is a very steady and powerful grip, it does not allow for very precise movements, which could be considered a downside.
Extended Karambit Knife Grip
The extended karambit knife grip is a slight variation to the reverse grip, but it has a whole different set of uses and qualities. The extended grip is simply when a karambit is flipped outwards from a reverse grip. Let’s look at exactly how to form the extended karambit knife grip:
Step 1:
Follow the steps laid out above on how to form a reverse karambit knife grip. Put shortly, your index finger should be through the ring at the end of the handle, and the blade should be facing down and outwards.
Step 2:
From its downward-facing position, spin the knife blade towards your body 270 degrees until it points in front of you and rests on the backs of your fingers. Use your middle finger as a ledge to steady the knife on and keep it facing outwards. You can use your thumb to apply pressure to the butt of the knife to ensure it stays steady. The cutting edge of the blade should be facing upwards.
If you perform the extended karambit knife grip correctly, the knife should be extended forward with its blade pointing in front of you. Your thumb, middle, and index finger should be used to steady the knife and ensure it stays in its correct position.
The extended karambit knife grip is far less practical than the previously mentioned holds, but it does give you one thing the others don’t: reach. The extended grip is excellent for a wide range of motion and reach, but it lacks strength, maneuverability, and control.
Other Karambit Knife Grips
Above we discussed the three major karambit knife grips, but it’s important to note that there are WAY more than three out there. In fact, there are quite literally hundreds of different ways to hold a karambit knife.
However, most of the other karambit knife grips are incredibly impractical or downright dangerous. The three grips mentioned above are the only ones a complete beginner should worry about, and they’ll work wonderfully for 99% of the tasks you need to complete with a karambit knife. As you become more comfortable with your karambit, you can begin to explore the other grip options, such as the mantis grip, and find out what you prefer.
But for nearly all beginners, learning the three basic grips that I talked about above is more than enough to set a good foundation for transitions, striking techniques, and other ways you can use your karambit knife.
Karambit Knife Transitions
One of the unique advantages that karambit knives have over other blades is their ability to change grips, directions, and positions quickly.
Switching grips, hands, or doing cool tricks with traditional knives is a clumsy and time-consuming process. However, with only a few fundamental karambit knife transitions, these things can be easily accomplished using a karambit even by beginners.
If you’re just getting into karambit knives, make sure you really know your basic grips before even attempting any transitions. You should also begin by practicing with a karambit knife trainer, which is a dull replica of a karambit knife that won’t hurt you if you mess up with your transition (when you’re first learning, this is inevitable).
Let’s take a look at a few of the most basic and popular transitions that you can do with your karambit knife.
Spinning Transitions
Many people get into karambit knives for the sole reason of wanting to learn spinning transitions. Spinning transitions are very flashy and pleasing to the eye, but they also serve a purpose.
Using spinning transitions, users can quickly change striking directions and get to places on their target that would otherwise be quite difficult to reach. Spinning transitions allow you to quickly change aspects of your knife work to better suit ever-changing situations.
On the other side of things, spinning transitions look SUPER cool when done quickly, so that’s always a plus! Make sure to be careful, especially when you’re first getting started because spinning a sharp blade definitely has its risks.
Switching Grip Transitions
You can also use transitions to switch between karambit knife grips. Some grips are more comfortable to switch to and from than others, but with enough practice and a little preplanning, you can easily change your grip on your knife quickly.
Quickly switching grips can be very beneficial in many situations. Each karambit knife grip has its own set of downsides and advantages, so if you find yourself in a situation and you’re holding your knife in an undesirable grip, it’s essential to be able to switch to a more suitable hold quickly.
Going from a reverse grip to an extended grip, or vice versa, is a very common grip transition that you can begin to practice even if you’re a complete beginner. Just make sure to take it slow and practice first with a karambit trainer knife if at all possible.
Switching Hand Transitions
It might seem like an unnecessary trick, but being able to switch which of your hands has a knife in it can prove to be quite useful in a handful of situations.
Especially if you’re faced with a self-defense situation, confusing your target by switching which hand has your knife can be quite effective. Switching hand transitions just gives you the added ability to move which side your strike comes from if you ever find yourself in need of the skill.
To be honest, switch hand transitions are not commonly used on an everyday basis, but when they come in handy, you’ll be glad. Regular knives are quite clumsy when switching hands, but karambit knives have a unique design advantage that makes the transition smooth and quick if you have practiced the move.
Basic Karambit Knife Striking Techniques
There are a bunch of karambit striking techniques, and they all have their uses. The below striking techniques are commonly used in combat or self-defense situations, but you can also use your karambit to do more mundane and utilitarian tasks.
Make sure to check out my article on ways to use your karambit knife if you want a little inspiration on how you can use your blade.
Karambit knife blades are slightly bent, making them ideal for slicing and striking motions and not stabbing. For different striking techniques, you can use transitions to switch your grip and correctly position the blade.
Anyways, let’s get into the different karambit knife striking techniques and look at the different ways you can use each one.
Vertical Strikes
Vertical strikes are usually quite impractical with traditionally shaped knives, but they are actually relatively easy to pull off with a karambit. You can perform a vertical strike using nearly any karambit knife grip.
Put simply, verticle strikes are (you guessed it!) when you strike using your karambit in a vertical motion. Both downward and upward vertical strokes are quite useful, but downward strikes seem to be more popular and have a more practical effect of “gutting” your target.
Horizontal Strikes
Horizontal strikes are very useful and practical knife motions in a variety of situations. There are tons of different versions of horizontal strikes, including left to right, right to left, jabs toward the center of your subject followed by horizontal movement to either side, and so many more.
Horizontal strikes are useful for quick strikes in either combat or self-defense situations. Cutting taught ropes or cloth can also be done effectively using a quick horizontal karambit knife strike.
Diagonal Strikes
Diagonal strikes are very similar to vertical ones, and you often use them in similar ways and similar situations. Getting the karambit knife’s blade at the correct angle for a diagonal strike can be challenging for beginners, but it isn’t that difficult with some practice.
You can perform diagonal strikes moving downwards or upwards and either from left to right or right to left. There are so many variations and endless possibilities.
Combination Strikes
A great advantage that karambit knives have over traditional knives is their ability to switch directions super quickly and easily. Even complete beginners with a little bit of practice under their belt can handle strike changes quite well.
You can use this versatility to your advantage by mixing and matching striking techniques with grip changes or other transitions between movements. These changes in striking direction can help in many situations, and overall just gives you more options.
How to Practice and Learn to Use a Karambit Knife
When learning how to use a karambit knife properly, the single best thing you can do to ensure your safety, speed of learning, and others’ safety, is to get a karambit knife trainer. There are many options out there for trainers, but as long as the blade isn’t sharp, you should be good to go.
A training knife allows you to learn and make mistakes (which is a crucial part of the learning process) without worrying about hurting someone or yourself.
Once you have the proper equipment for learning how to use a karambit knife, the next thing is just to practice. You can watch a ton of videos, read about how to do it, and so much more, but practicing with your trainer is the one thing that will truly make you better at using a karambit.
As you begin to progress and become more comfortable with your karambit training knife, you can start to learn more advanced grips and techniques. Once you are comfortable and well-versed in handling a karambit knife, you can begin to use a sharp, or “live” karambit.
If you’re looking to get a karambit knife, check out my recommendations below! If you plan to carry your knife with you a lot, I would recommend a folding karambit (The CRKT Provoke and the Spyderco Karahawk are great).